Maya GLSL Shader Part 2
I use this simple texture loading example to introduce Maya shader semantics and annotations, both of which are indipendent from the shading language you're going to use.
By reading the Autodesk official documentation, I've understood that annotations are special built-in Maya attributes that help us make the shader communicate with Maya UI.
For example, with annotations you can decide the order of the parameters of a shader in Maya UI or which widget to show for a certain parameter.
Semantics on the other hand, are Maya built-in attributes and uniforms, for example the WorldView semantic represents the world-view transformation matrix.
You can find the Autodesk official documentation on semantics and annotations here and here.
Let's go back to our example.
I'm going to use the three-files method from the previous post, so create three new files: basic_texture.ogsfx, basic_texture.glslv and basic_texture.glslf.
Now add a model to the scene, assign a new material and choose GLSL Shader as material type.
The code in basic_texture.ogsfx is pretty much the same as in the previous post, just the names of the included files are different.
basic_texture.ogsfx
1 2 3 4 5 6 7 8 9 10 11 12 13 14 15 16 17 18 19 20 21 22 23 24 25 26 27 28 29 30 31 32 33 34 35 36 37 38 39 40 41 42 43 44 45 46 47 48 49 50 51 52 53 | // Tell included shaders to use OGSFX semantics and streams: #define OGSFX 1 //########################### UNIFORMS ########################### // Uniform parameter handling // Loads the uniforms from all shader stage files #define HIDE_OGSFX_UNIFORMS 0 #define HIDE_OGSFX_STREAMS 1 #define HIDE_OGSFX_CODE 1 #include "basic_texture.glslv" #include "basic_texture.glslf" //########################### ATTRIBUTES ########################### // Input stream handling: // Loads the attribute streams from all shader stage files #define HIDE_OGSFX_UNIFORMS 1 #define HIDE_OGSFX_STREAMS 0 #define HIDE_OGSFX_CODE 1 #include "basic_texture.glslv" #include "basic_texture.glslf" //########################### FUNCTION ########################### // Code handling: // We need to load the vertex stage and fragment stage in two // different GLSLShader blocks in order to specify them in the // technique definition below: #define HIDE_OGSFX_UNIFORMS 1 #define HIDE_OGSFX_STREAMS 1 #define HIDE_OGSFX_CODE 0 // Vertex shader. GLSLShader VS { #include "basic_texture.glslv" } // Fragment shader. GLSLShader FS { #include "basic_texture.glslf" } // Techniques. technique Main { pass p0 { VertexShader (in vs_input, out vs_out) = VS; PixelShader (in fs_input, out fs_out) = FS; } } |
basic_texture.glslv
1 2 3 4 5 6 7 8 9 10 11 12 13 14 15 16 17 18 19 20 21 22 23 24 25 26 27 28 29 30 31 32 33 34 35 36 37 38 39 40 41 42 43 44 45 46 47 48 49 50 51 52 53 54 55 56 57 58 | //########################### GLSL VERSION ########################### //If it's not a Maya OGSFX Shader set the GLSL version for common GLSL shaders #if !OGSFX #version 330 #endif //########################### UNIFORMS ########################### //Put here OGSFX uniform specific code #if !HIDE_OGSFX_UNIFORMS #if OGSFX uniform mat4 MVP : WorldViewProjection; #else uniform mat4 MVP; #endif //OGSFX #endif // HIDE_OGSFX_UNIFORMS //########################### ATTRIBUTES ########################### //Put here OGSFX attribute specific code #if !HIDE_OGSFX_STREAMS #if OGSFX attribute vs_input { vec3 Position : POSITION; vec2 UV : TEXCOORD0; }; // The vertex shader ouput and also the pixel shader input attribute vs_out { vec2 outUV; }; #else in vec3 Position; in vec2 UV; out vec2 outUV; #endif //OGSFX #endif //HIDE_OGSFX_STREAMS //########################### FUNCTION ########################### //Put here main function #if !HIDE_OGSFX_CODE void main() { outUV = vec2(UV.x, 1.0 - UV.y); gl_Position = MVP * vec4(Position, 1); } #endif //HIDE_OGSFX_STREAMS |
At line 12 in the vertex shader, we use Maya semantics to define the MVP matrix.
To apply a texture to a model, we need the UV coodinates from Maya so I've added vec2 UV : TEXCOORD0 inside the vs_input attribute.
This time vs_out passes UVs from vertex to fragment shader so I've added vec2 outUV inside the vs_out attribute.
Finally, in the vertex shader body I simply compute the UV coordinates and store them inside the outUV attribute that will be passed to the fragment shader.
basic_texture.glslf
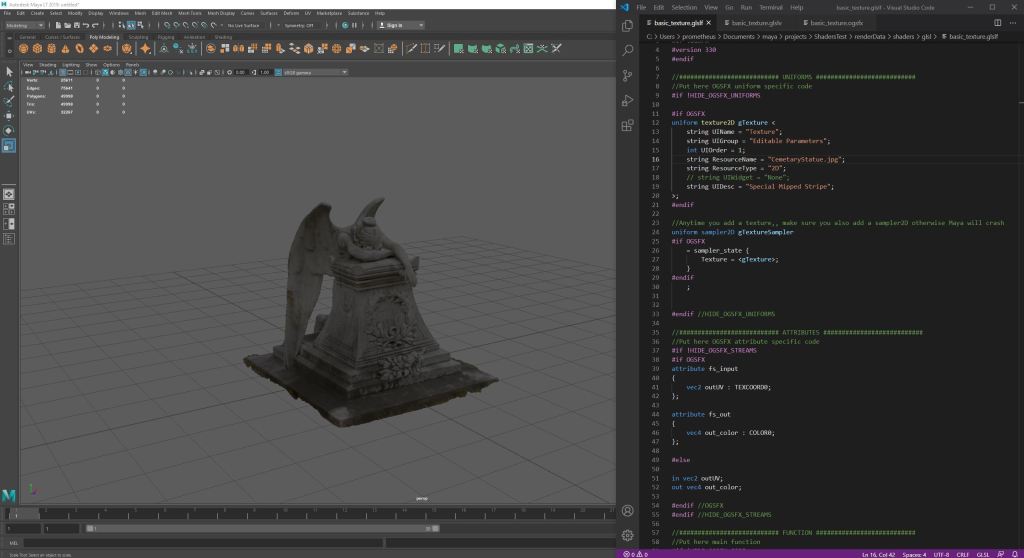
1 2 3 4 5 6 7 8 9 10 11 12 13 14 15 16 17 18 19 20 21 22 23 24 25 26 27 28 29 30 31 32 33 34 35 36 37 38 39 40 41 42 43 44 45 46 47 48 49 50 51 52 53 54 55 56 57 58 59 60 61 62 63 64 65 66 67 | //########################### GLSL VERSION ########################### //If it's not a Maya OGSFX Shader set the GLSL version for common GLSL shaders #if !OGSFX #version 330 #endif //########################### UNIFORMS ########################### //Put here OGSFX uniform specific code #if !HIDE_OGSFX_UNIFORMS #if OGSFX uniform texture2D gTexture < string UIName = "Texture"; int UIOrder = 1; string ResourceName = "CemetaryStatue.jpg"; string ResourceType = "2D"; //string UIWidget = "None"; >; #endif //Anytime you add a texture,, make sure you also add a sampler2D otherwise Maya will crash uniform sampler2D gTextureSampler #if OGSFX = sampler_state { Texture = <gTexture>; } #endif ; #endif //HIDE_OGSFX_UNIFORMS //########################### ATTRIBUTES ########################### //Put here OGSFX attribute specific code #if !HIDE_OGSFX_STREAMS #if OGSFX attribute fs_input { vec2 outUV : TEXCOORD0; }; attribute fs_out { vec4 out_color : COLOR0; }; #else in vec2 outUV; out vec4 out_color; #endif //OGSFX #endif //HIDE_OGSFX_STREAMS //########################### FUNCTION ########################### //Put here main function #if !HIDE_OGSFX_CODE void main() { float ambientStrength = 1.0; out_color = ambientStrength * texture2D(gTextureSampler, outUV); } #endif //HIDE_OGSFX_STREAMS |
The fragment shader is where the most interesting changes happen.
At line 12 we declare a uniform that will hold our texture. By default uniforms are automatically displayed in Maya Attribute Editor using the same name they are declared within the code.
By using annotations, we can better specify how we want them to be displayed in the Attribute Editor.
From line 13 to line 17, there are some of these annotations:
In the attribute fs_input, I've added vec2 outUV : TEXCOORD0 that are the UV coordinates coming from the vertex shader.
Then, in attribute fs_out I've added the output color vec4 out_color : COLOR0.
Finally, in the fragment shader body I sampled the texture and multiplied it by an arbitrary ambientStrength just for testing.
Now go back in Maya Attribute Editor and select your new GLSL material.
Load basic_texture.ogsfx file and under Parameters, you should see a parameter called Texture. It's the parameter representing our texture in the fragment shader code.
Click on the symbol to load textures and select the texture file you want to load.
Now the texture should be applied to your model.
At line 12 we declare a uniform that will hold our texture. By default uniforms are automatically displayed in Maya Attribute Editor using the same name they are declared within the code.
By using annotations, we can better specify how we want them to be displayed in the Attribute Editor.
From line 13 to line 17, there are some of these annotations:
- string UIName - gives a more user-friendly name to the texture parameter in the Attribute Editor.
- int UIOrder - lets us organize the order of the parameters in the Attribute Editor. I have just one parameter so I've set it to 1.
- string ResourceName - lets us specify a texture to be loaded by default.
- string ResourceType - specifies the type of the texture.
- string UIWidget = None - it's commented out but basically lets us specify what type of widget to use for the parameter and if we put None, we can hide it.
In the attribute fs_input, I've added vec2 outUV : TEXCOORD0 that are the UV coordinates coming from the vertex shader.
Then, in attribute fs_out I've added the output color vec4 out_color : COLOR0.
Finally, in the fragment shader body I sampled the texture and multiplied it by an arbitrary ambientStrength just for testing.
Now go back in Maya Attribute Editor and select your new GLSL material.
Load basic_texture.ogsfx file and under Parameters, you should see a parameter called Texture. It's the parameter representing our texture in the fragment shader code.
Click on the symbol to load textures and select the texture file you want to load.
Now the texture should be applied to your model.
